How to Set Up a Home Server VPN in 2026, the easy way
Learn how to set up a home server VPN with WireGuard Easy. Protect your traffic, access your network remotely, and self-host your own VPN server for free

Every time you connect to public Wi-Fi at a coffee shop, airport, or hotel, your traffic is exposed. Passwords, messages, bank sessions, everything travels through networks you don’t control. Commercial VPN providers promise to fix this, but they just shift the trust problem from your ISP to their servers. You’re still trusting someone else with your data.
The real solution? Run your own VPN server at home. You control the hardware, you control the encryption, and nobody sits between you and your network. In 2026, setting up a home server VPN is easier than ever, especially with WireGuard and a platform that handles the heavy lifting for you.
Why You Need a Home Server VPN

A home server VPN does two things that no commercial provider can match:
- • Encrypts all your traffic through your own infrastructure. Your data never touches a third-party server. No logs, no data harvesting, no “trust us” privacy policies. Just your hardware, your keys, your rules.
- • Gives you secure remote access to your entire home network. Access your files, your self-hosted apps, your NAS, your cameras, everything, from anywhere in the world as if you were sitting at home.
Commercial VPNs route your traffic through their data centers in countries you’ve never visited. Your browsing history exists on their servers, governed by their retention policies and whatever law enforcement requests they receive. Some keep logs despite claiming otherwise. Others have been breached.
With a self-hosted VPN, the equation changes completely. You are the provider. The encryption keys live on your hardware. The logs exist only if you choose to create them. And the only person who can access your traffic is you.
WireGuard: The Modern VPN Protocol

If you’ve ever tried setting up OpenVPN, you know the pain. Configuration files, certificate authorities, complex routing rules, and a protocol designed in 2001 that shows its age. It works, but it’s heavy, slow to connect, and a nightmare to maintain.
WireGuard changed everything. Built from the ground up with modern cryptography, it’s faster, simpler, and more secure than legacy VPN protocols. Here’s why WireGuard is the right choice for a home server VPN in 2026:
WireGuard VPN Speed vs OpenVPN
WireGuard runs inside the Linux kernel, which means near-native network performance. Where OpenVPN might add 30-50% overhead, WireGuard typically adds less than 5%. Connections establish in milliseconds instead of seconds. On a home server, this means your remote access feels almost like being on the local network.
Built-In Encryption and Modern Cryptography
WireGuard uses ChaCha20 for encryption, Poly1305 for authentication, Curve25519 for key exchange, and BLAKE2s for hashing. No cipher negotiation, no legacy compatibility, no configuration mistakes that accidentally weaken your security. The entire codebase is roughly 4,000 lines of code compared to OpenVPN’s 100,000+, making it vastly easier to audit.
In plain English: WireGuard uses a small, tightly focused set of modern algorithms instead of letting you pick from dozens of options where some might be outdated or weak. Fewer choices means fewer ways to get it wrong. And because the entire program is about 25 times smaller than OpenVPN, security researchers can actually read and verify the whole thing, which means bugs and vulnerabilities get found and fixed faster.
Why WireGuard Is Easier to Configure and Maintain
A WireGuard configuration is a few lines. A peer is a public key and an IP. That’s it. No certificates to manage, no expiration dates to track, no complex PKI infrastructure. Simple means fewer things that can break, and fewer things that can be misconfigured into a security hole.
Think of it this way… Older VPN protocols work like a lock that needs a whole keychain of certificates, secrets, and renewal dates just to open the door. WireGuard works like a single modern key, one short code per device, and you’re connected. If something ever goes wrong, there’s only one thing to check instead of ten.
How to Set Up a VPN Server on Your Home Server

Setting up WireGuard manually involves installing the package, generating key pairs, editing configuration files, configuring firewall rules, and enabling IP forwarding. For each client device, you repeat the key generation, add peers to the server config, and distribute configuration files. It’s doable, but tedious and error-prone.
That’s where WireGuard Easy (wg-easy) comes in. It wraps the entire WireGuard server in a clean web interface that handles everything: creating clients, generating QR codes for mobile setup, monitoring connections, and managing the whole thing from your browser.
No terminal. No config files. No mistakes.

The Traditional Way: Terminal, Keys, and Config Files
Doing this manually on Linux means installing WireGuard, generating cryptographic key pairs for the server, writing a configuration file, setting up firewall rules, enabling IP forwarding, and repeating the key generation for every single client device. Then you hand out .conf files or type long keys into your phone. Every time you add a new device, you go through the same process again.
It works, but it’s tedious, error-prone, and intimidating for anyone who isn’t comfortable in a terminal.
The Easy Way: WireGuard Easy on HomeDock OS
HomeDock OS turns any computer into a private cloud server. It runs on Linux natively, on Windows and macOS via HomeDock OS Desktop, or inside Docker on any platform. Once installed, you get a full App Store with hundreds of self-hosted applications, including WireGuard Easy.
The fastest way to get started is to install HomeDock OS on your machine. It’s free for personal use, cross-platform, and takes just a few minutes. Once running, the entire VPN setup is three steps:
Step 1: Install HomeDock OS
Choose your platform: Linux, Windows, macOS, or Docker. HomeDock OS supports them all. On Windows and macOS, HomeDock OS Desktop turns your computer into a private cloud without any Linux knowledge required.
Step 2: Open the App Store and Install WireGuard Easy
Open the App Store inside your HomeDock OS instance, search for WireGuard Easy, and click install. That’s it. HomeDock OS handles the container deployment, networking, and configuration automatically.
Step 3: Create Your VPN Clients
Open WireGuard Easy from your HomeDock OS desktop. Click “New Client”, give it a name, and you’ll get a QR code for your phone or a downloadable config file for your laptop. Scan, connect, done.
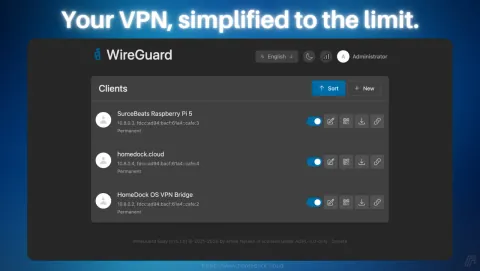
That’s three steps. No key generation, no config files, no firewall rules. HomeDock OS and WireGuard Easy handle everything under the hood while giving you a clean, visual interface to manage your VPN.
Secure Your VPN With SSL Certificates
Once your home server VPN is running, you’ll want to access the management interface securely over HTTPS. HomeDock OS has native SSL support built in, meaning you can enable HTTPS without installing or configuring a reverse proxy.
Even better, many applications on HomeDock OS inherit the same SSL certificates automatically. WireGuard Easy included. No need to configure Nginx, Caddy, or Traefik. No separate certificate management per app. HomeDock OS handles it all at the platform level.
For the full SSL setup walkthrough, head over to the HomeDock OS documentation (Menu > Resources > Documentation). The process supports self-signed certificates for local access and CA-signed Let’s Encrypt certificates on HomeDock OS Cloud Instances that renew automatically.
Home Server VPN vs Commercial VPN: What’s the Difference?

Let’s be clear about what a self-hosted VPN does and doesn’t do compared to commercial providers:
What a Home Server VPN Does Better
- • True zero-trust encryption: Your keys, your hardware, zero third parties involved
- • Remote access to your home network: Reach every device and self-hosted service securely
- • No subscription fees: One-time setup, free forever
- • No bandwidth limits or throttling: Your connection, your speed
- • No logs by design: Nothing to subpoena, nothing to breach, nothing to sell
What Commercial VPNs Do Differently
- • IP masking across countries: A home VPN exits through your home IP, not a datacenter in Switzerland
- • Bypassing geo-restrictions: Your traffic still originates from your home location
- • DDoS protection on the endpoint: Your home IP is exposed as the VPN endpoint
For most self-hosters, a home server VPN is the better choice. You get encrypted remote access, network-wide security, and complete privacy without trusting any provider. If you specifically need geo-unblocking or IP anonymization, a commercial VPN serves a different purpose entirely, and you could even run both.
Advanced: Combine Your VPN With Other Self-Hosted Apps
The real power of a home server VPN shows when you combine it with other self-hosted services. Once connected to your VPN, you can securely access everything on your network:

With your VPN running on HomeDock OS, every app you install becomes securely accessible from anywhere. Your Nextcloud files, your Vaultwarden passwords, your media server, your monitoring dashboards, all behind your own encrypted tunnel.
Get Your Home Server VPN Running Today
Setting up a self-hosted VPN with WireGuard used to require Linux expertise, networking knowledge, and patience. In 2026, it requires three clicks on HomeDock OS. Install HomeDock OS on any computer, Linux, Windows, macOS, or Docker. Open the App Store. Install WireGuard Easy. You now have your own VPN server.
HomeDock OS
Image Gallery
Related Links